Posts

Showing posts from 2012

How to make infrared sensor motion activated lamp?

Image
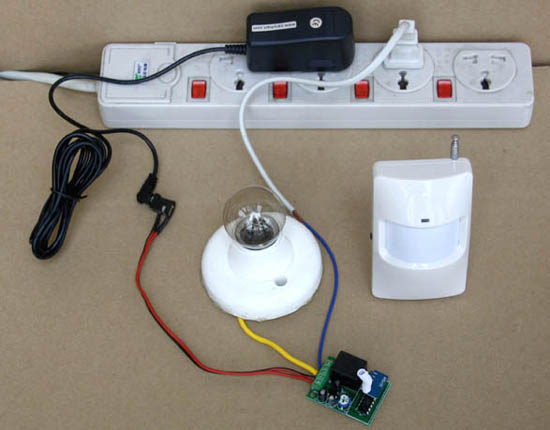
An infrared sensor motion activated lamp is a security and energy saving feature which can be installed into dark home, hall, corridor or staircase. The lamp works by detecting motion in the room. Within the area of detection, the motion detector will be triggered by any movement, and then send signal to the lamp. So the lamp will come on automatically. The lamp will stay on as long as motion is detected. Here we talk about how to make an infrared sensor motion activated lamp using wireless movement detector and rf time delay receiver . Receiver specification: Model No.: S1D-DC12 Control Mode: Delay (Press -> ON; Then OFF after the delay time) Adjustable delay time: 2~40 seconds Coding Type: Fixed code by soldering Operating Voltage: DC12V Movement detector specification: Working distance: 100 m (Open field) Detection distance: 10m Detection range: Fan-shaped angle 110° Decode: Fixed code by Pins The wiring and operation images are as follows: Wire the rf receiv

Momentary Remote Control Activate Hot Water Pump

Image
One of our customer said that he’d like to activate a hot water circulating pump in the upstairs bathroom from his kitchen which required a momentary start signal. The pump had its own power from 110/120V AC and timed operation. We recommend 1 Channel DC RF Momentary Remote Control Switch (S1M-DC12 & C-1) to him. The receiver is relay output (normally open and normally closed). Power supply for the receiver and the water pump are different. That means it will not cause electromagnetic interference during water pump operation. Simple wiring image is as follow: Press and hold the remote button, he can activate the hot water circulating pump. Online shop:  http://www.carymart.com/

Light Fireworks by RF Momentary Remote Control

Image
Do you want to make safe and easy remote control fireworks ignition for your holiday celebrations? That means no longer do you need to hand light the fireworks personally. And you can stand back and watch your display with your guests and enjoy the show! Here we talk how to use simple 1-channel rf momentary remote control to light fireworks. The first picture shows the materials you should prepare. Now wire the ignition head of fireworks to the rf receiver according to the wiring diagram. As you see in the picture, press and hold the remote button to light the fireworks. So easy to do it. Warning: Fireworks are dangerous, so be careful when handling ignition. Clear the area before launching the fireworks, check to make sure your power supply is disconnected while wiring up the fireworks. Online shop:  http://www.carymart.com/

6CH 110VAC RF Remote Controller Switch On Off 4 Ceiling Lights & 2 Fans

Image
I wanted my four lights and two ceiling fans to be controlled by one universal remote. After searching all over for an easy method, I came across one handy little electronic gadget which made the process both affordable and easy! It's an appropriate model of RF Remote Control Receiver and Transmitter from the various models available at carymart.com. In my case I needed a 6 button remote to separately turn on or off 2 ceiling fans and 4 lights. The Model I found was a 6-Channel 315 MHz RF Remote Control Transmitter and 110V AC Powered Receiver . The Transmitter and receiver are represented as: Next, I installed the hardware for the fans and lights on my ceiling. I have 2 canister lights and 2 fans each with a light of their own. These are represented by the following symbols: Then I decided how I wanted the buttons on the remote to correspond to the lights and fans in my room. I settled for this arrangement: Now, we are ready to start wiring power to the relays

How to Wire Remote Controller to Motor of Roof Window?

Image
Do you know how to wire a remote controller to the motor of roof window, so that the roof window can be remotely controlled from anywhere within the reliable distance? Let's have a try.  Firstly, we need to prepare these things: 1 x 12V motor remote controller (transmitter & receiver) 2 x 12V linear motors 1 x DC 12V power adapter *Maximum current of the remote controller is up to 10amp which is enough for controlling two linear motors. Secondly, wire two linear motors to the receiver according to the wiring diagram. Finally, control the linear motor by the remote transmitter.  Press button ▲: motor rotates in forward direction, the roof window is open. Press button ▼: motor rotates in backward direction, the roof window is closed. Press button ■: rotation stops. Online shop:  http://www.carymart.com/

How to remote control tv sliding panel?

Image
The sliding panel mechanism can help the flat-panel TV blend in better with the wall surface. Instead of covering the panel with canvas artwork, the sliding panel mechanism conceals the TV with a panel that matches the existing wall surface. It offers the ultimate in look, functionality and wow factor. One of my friends built a sliding panel mechanism to cover up the TV. It was started by an ac electric motor and he would like to add an remote to control it. I recommended him an ac rf motor remote control switch model of 0020318 (S1FC-AC220 & CV-4). It contains a remote transmitter and a receiver. Wire the electric motor to the receiver and it can be controlled by the remote transmitter. Wiring diagram is shown below:

Reversing Motor Of Awning By RF Remote Control System

Image
Well, if there is a remote control to open and close your awnings, you’ll get more convenience. You can control the awnings anywhere, even inside your home. That seems fantastic, isn't it? Many remote controlled awnings are available on the market, but the price is quite expensive. So if you have a manual-operated awning and you would like to change it to a remote-controlled one with less money. I will suggest you choose an rf remote control system. It includes a transmitter and a receiver. Wire the receiver to the electric motor of awning then it can be controlled by the remote transmitter. Looking at the picture below, it is the electric reversing motor of awning. Then I find an dc motor remote controller model of 0020317 (S1FC-DC12 & CV-4) from carymart.com. It features forward-reverse-stop capability. You can rotate the motor in forward or reversal direction by transmitter from any place within a reliable distance; wireless signal pass through walls, floors an

2 Channel RF Remote Control & Receiver Switch 3 LED Lights

Image
Tang was looking for wireless remote control to switch his three led light strips. one button of remote turns on one red light; another button turns off that red light and turns on two green lights at the same time. The working voltage of led light is 12v dc. According to his requirements, a dc power 2-channel receiver with latching mode and 2-button remote controller are suitable for him.  Picture from http://www.carymart.com Simple wiring diagram is as follows: Channel 1 is for red light. Channel 2 is for two green lights. When button 1 of remote turns on the red light, two green lights are off. When button 2 turns on two green lights, the red light is off. Online shop:  http://www.carymart.com/

Mini PIR Infrared Motion Sensor Detector Module

Image
This is an pir infrared movement sensor module , commonly used to detect human body movement. It has higher sensitivity and broader detective range than others. Once a person enters into the detective range, the output will be high level. While the person goes out of the detective range, it will prolong automatically 20 seconds of retention time then the high level output will shift to the low level output. This device requires a 5-9V signal to operate. Typical applications are for automatically controlling lights, and taking snapshots of pests or wild animals. Widely applied for movement detection, automatic control, proximity switch, electronic theft prevention, safety protection, remote control measurement, etc. Features: Repeated triggering method Broad working voltage, low power consumption High level signal output, easy to be butt jointed with different types of circuits Retention time is adjustable Working voltage is adjustable Specification: Operating temper

Short Description of Toggle / Momentary / Latched Working Modes

Generally there are three working modes for rf remote controls: toggle, momentary, latched. Toggle mode is used most often. Controlling lamp, for example, press the button of remote, turn on the lamp; press the button again, turn off the lamp. Momentary mode can be set to control rolling blind or rolling door. Press and hold the button of remote, open the blind or door; release the button, close the blind or door. Both toggle and momentary mode are motivated by single relay, which means you can work these two modes with single button remote. As regards the latched mode, it is motivated by relay group. For relay group, only one relay will be on at a time, e.g. press remote button A, relay A will be on, and relay B will be off; press remote button B, relay B will be on, and relay A will be off. To be more specific, when you control the lamp by latched mode, you should prepare at least two buttons remote. Press button A, the lamp is on; press button B, the lamp is off. Online s

Application of One-Transmitter-To-Many-Receivers System

One-transmitter-to-many-receivers system means you can use one remote control (transmitter) to switch two or more receivers. It is often used for controlling two or more electrical devices in different places by one remote. Look at the following example. David has a big square bunch of trees. He wants to buy 6 12VDC receivers and place 1 receiver connected to 1 amplifier and 1 hunting speaker in every corner of the trees. Then he will stay in the blind and operate them with the remote control. Remote distance should be 100m. So David needs one remote with 12 buttons and six 2-channel receivers. Three choices for working mode: toggle, momentary or latching. If he chooses toggle mode, he can do like this: Press button 1 on remote, switch on channel 1 of receiver 1 Press button 1 again, switch off channel 1 of receiver 1 Press button 2 on remote, switch on channel 2 of receiver 1 Press button 2 again, switch off channel 2 of receiver 1 Press button 3 on remote, switch on chann